- Open the configuration file in your favorite editor (mine is nano)
sudo nano /etc/network/interfaces
- Comment out the section where dhcp is being used (put the # in front of the line):
#auto eth1
#iface eth1 inet dhcp - Add a section like this example:
auto eth1
iface eth1 inet static
address 192.168.0.101
netmask 255.255.255.0
network 192.168.0.0
broadcast 192.168.0.255
gateway 192.168.0.1 - Close and save the file
- Reload the network service:
sudo /etc/network restart
- Check to make sure you can access other computers/internet by using ping:
ping www.google.com
- If you don't get a response then you may have set your network information incorrectly. Just go back and repeat this process at step 3.
Wednesday, January 21, 2009
Create a Static IP from the Command Line
Creating a static IP from the command line is a very short task. All you need to edit is one configuration file and restart the networking service. You will need to know the settings for your network to do this. I will show how to set a static IP of 192.168.0.101 on a network with a gateway of 192.168.0.1.


Tuesday, January 20, 2009
Add extra storage on the fly with LVM2
Currently I am in the process of creating a file/print server for my home network. It's an older computer but I wanted to experiment with various set-ups and configurations. Two of my requirements were that I must be able to add extra storage on the fly and I must be able to see the two hard drives as one logical unit. The only way (at least that I know of) is to use LVM. I have used it in the past, but I never really needed so I usually did not pick it during the install. In fact my current Ubuntu desktop does not have LVM on it.
During my internet searches I came across this great article, A Beginners Guide to LVM. Read this all the way through and you should get a good grasp of the main commands of LVM. Since that article did not really explain how to what I wanted I had to adapt it to my needs. Here are the steps I used to get my 80GB Maxtor(sda) and 60GB Western Digital(sdb) to work together as one logical unit. I am also using ext3 as my filesystem because it supports on-line resizing.
During my internet searches I came across this great article, A Beginners Guide to LVM. Read this all the way through and you should get a good grasp of the main commands of LVM. Since that article did not really explain how to what I wanted I had to adapt it to my needs. Here are the steps I used to get my 80GB Maxtor(sda) and 60GB Western Digital(sdb) to work together as one logical unit. I am also using ext3 as my filesystem because it supports on-line resizing.
- Fresh install of Ubuntu Server 8.10
- Run updates:
sudo aptitude update && sudo aptitude safe-upgrade
- Reboot because of kernel upgrade
- Figure out what the extra hard drive is (mine is sdb):
sudo fdisk -l
- Partition the hard drive as Linux LVM:
sudo fdisk /dev/sdb
- Initialize partition for use by LVM (on my system sdb1 is swap):
sudo pvcreate /dev/sdb2
- Display attributes of volume groups to find your group name (mine is ubuntu-server):
sudo vgdisplay
- Add my physical volume to my volume group:
sudo vgextend ubuntu-server /dev/sdb2
- Now extend the logical volume root to include the new physical volume:
sudo lvextend -L128G /dev/ubuntu-server/root
- Lastly, resize the filesystem to include the new free space:
sudo resize2fs /dev/ubuntu-server/root
Thursday, January 15, 2009
Developing with NetBeans IDE
Programming is a hobby of mine and in recent days I have been testing out various IDEs (Integrated Development Environments). One such that I have really enjoyed using is the NetBeans IDE. One of the greatest features (at least in my opinion) is that no matter what OS I am using I can still be editing my programs with Netbeans. In my daily routines I will end up using Windows, Mac, and Linux so cross platform applications will always get a plus in my book. I also find that one of my greatest frustrations about programming is that most developers only create programs for a specific OS. Now, I understand why they do this (majority), but for people like me (minority) it is always a drawback to an application that only works in one OS. Enough ranting though lets get the latest NetBeans installed in your Ubuntu computer.
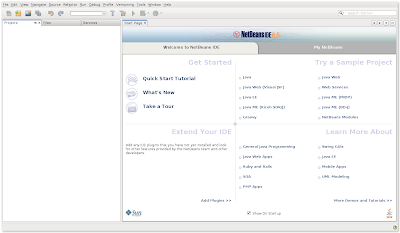
- Go to http://www.netbeans.org/downloads/index.html to download the version you want. Personally I chose the Java version but if you want Ruby, C++, or PHP you will want the All version. At the time of this writing the current version is 6.5 and my download was 208 MB.
- Wait for download to complete...
- Open a terminal and cd to the directory you saved it in. For me I saved it to my desktop so I typed in: cd Desktop/
- Now type: ./netbeans-6.5-ml-java-linux.sh (or whatever your version happens to be, use tab to autocomplete).
- If that doesn't work then it is possible that it needs the permission to execute. You could right-click>properties. Then under permissions check the box that says "Allow executing file as program" or you could type into command line: chmod +x ./
- You should see a screen much like the one above. Just follow the prompts and you will have NetBeans installed in no time.


Thursday, December 18, 2008
Repairing a corrupted XFS file system
I have been testing out the XFS file system. When 8.10 came out I did a fresh install with XFS as the partition for the root directory. Everything was working fine until one day I was having trouble running programs like Firefox and mplayer. Nothing seemed to be working very well. Programs would load but then all of the sudden they would quit. Finally I tried to log out but all I got was a whitescreen and the computer would not shut off. I did the unthinkable and pressed the power button until it turned off.
Two days later I tried to start up my laptop only to be greeted with an error message about the root filesystem not being able to load. I tried the alternate kernel, but that would not load either. It seemed like the drive had not mechanically failed because the bootloader would come up and it would try to mount the root file system. I tried putting in the install CD and using rescue mode but that was not any help. All it did was tell me that it could not load the root filesystem. After doing a few searches I found that running xfs_repair was my best option but the only way to do that was to take the drive out and connect it to my desktop computer through a USB to ATA-66 adapter.
Once connected to my desktop all that was needed was to figure out which /dev/??? it was. A quick check in dmesg showed it to be /dev/sdb3. I then ran:
I put the drive back in the laptop and it was able to boot, but it was still having problems with some programs. Right now it is getting a fresh install of Ubuntu 8.10! (but this time I am sticking with ext3)
Two days later I tried to start up my laptop only to be greeted with an error message about the root filesystem not being able to load. I tried the alternate kernel, but that would not load either. It seemed like the drive had not mechanically failed because the bootloader would come up and it would try to mount the root file system. I tried putting in the install CD and using rescue mode but that was not any help. All it did was tell me that it could not load the root filesystem. After doing a few searches I found that running xfs_repair was my best option but the only way to do that was to take the drive out and connect it to my desktop computer through a USB to ATA-66 adapter.
Once connected to my desktop all that was needed was to figure out which /dev/??? it was. A quick check in dmesg showed it to be /dev/sdb3. I then ran:
xfs_repair -L /dev/sdb3When that finished I was able to mount the drive and get any files I wanted off of it.
I put the drive back in the laptop and it was able to boot, but it was still having problems with some programs. Right now it is getting a fresh install of Ubuntu 8.10! (but this time I am sticking with ext3)
Thursday, December 4, 2008
Installing LiVES
Another good video editor out there is called LiVES. I wanted to test out the latest version so I went to GetDeb for the download. The website getdeb.net is maintained by a volunteer group that makes fresh .deb packages featuring some of the most used software in Ubuntu. Sometimes the Ubuntu repos can get behind and not have the latest and greatest, so this website is a great companion when you need or want to have the latest version of certain software. So here are the steps:

- Download the .deb file from getdeb.net.
- Double-click on the file to start up the GDebi package installer.
- First it will tell you that you should install the one in the official channel. Nevermind the message because you are installing the latest.
- The package installer will most likely tell you that it needs to download some other packages for dependencies.
- Click on Install package and when the installer finishes you can find LiVES under Applications>Sound & Video

Tuesday, December 2, 2008
Installing Cinelerra
Recently I have needed to do some video editing and wanted to check out some of the best video editors for Linux. It looked like Cinelerra had the best options but it was not clear how to install it easily. I did not want to install from source so after some careful searching around I found the easy way. You can also view these instructions here (I made some additions as they did not work for me as they were written).
- Install a repository using this link. After you download the package make sure you install it with the GDebi package installer.
- Open a terminal and type this command: sudo apt-get update
- Now decide which package you need; cinelerra (x86 and x86_64 without opengl 2.0 video card) cinelerra-generic (x86 and x86_64 with opengl 2.0 video card). You can see the other versions on the page I mentioned earlier under the installation instructions for Hardy
- Install your package using apt-get: sudo apt-get install cinelerra-generic
- Once installation completes you should be able to find Cinelerra under Applications>Sound & Video.
Dual Monitors with Nvidia GeForce 8600 GT
Once you install the restricted hardware drivers and you have your Nvidia card working you can then proceed to set up dual monitors. Open up System>Administration>Nvidia X Server Settings. This will open up a dialog box like so...
 This nice GUI will allow us to set up our dual monitor interface. I will say that the program can be quite fickle at times and sometimes it will not work even though it should work. Just keep trying with the options until you get a working combination. I wanted my second monitor, which happens to be a regular 15" CRT, to simply be an extension of my desktop. This is done using the TwinView configuration option as seen in the next photo.
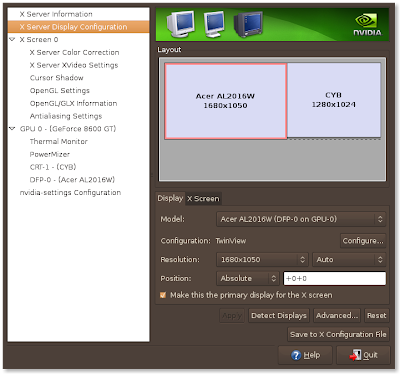 And the options for my second monitor...
 Once you get the right settings made make sure you click the Save to X Configuration File. If you don't click that then next time you start up all of your custom settings will be gone and you will have to play around with it again.
Setting up the dual monitors was fairly quick for me. Took approx. 10 minutess of playing with various settings to get it to display just like I wanted it too. If you have an Nvidia card you should be able to set these up without too much hassle using similar options like I did. Of course if you want to do a separate X screen you could choose that as well instead of the TwinView.
 This nice GUI will allow us to set up our dual monitor interface. I will say that the program can be quite fickle at times and sometimes it will not work even though it should work. Just keep trying with the options until you get a working combination. I wanted my second monitor, which happens to be a regular 15" CRT, to simply be an extension of my desktop. This is done using the TwinView configuration option as seen in the next photo.
 And the options for my second monitor...
 Once you get the right settings made make sure you click the Save to X Configuration File. If you don't click that then next time you start up all of your custom settings will be gone and you will have to play around with it again.
Setting up the dual monitors was fairly quick for me. Took approx. 10 minutess of playing with various settings to get it to display just like I wanted it too. If you have an Nvidia card you should be able to set these up without too much hassle using similar options like I did. Of course if you want to do a separate X screen you could choose that as well instead of the TwinView.
Subscribe to:
Posts (Atom)