I will assume that the reader knows the basics of installing the Ubuntu Server. First of all you will need to download the Server ISO and burn it to disk. Once you have that, the only other item you will need is a computer to test it out on that is ready to have a RAID 1 array put on it. In order for it to be ready it will need to have at least 2 drives of equal size. If you don't happen to have a physical computer you could set up a virtual host will two small drives of equal size. Either way you will need a system that you can do a fresh install of Ubuntu Server 8.10. The screenshots you will see will be from a virtual machine.
Initial Set-up and the /boot partition
- Proceed as normal through the installation steps until you get to the part where you need to partition your drive.
- Choose Manual

- We want to create these partitions: 100 MB for /boot; 256 MB for swap; the rest for /;
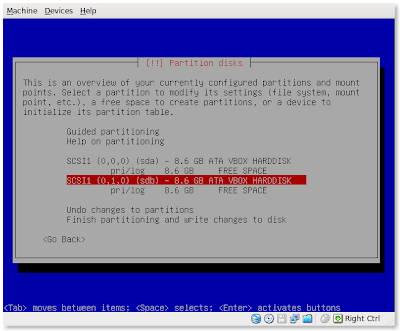
- Select the first hard drive.

- If it asks you to create an empty partition table choose "Yes."
- Repeat four and five for the other drive as well and now you should have something like this.
- Now we are going to make the partitions on each drive. Select the first drive to partition it's free space.
- Choose create a new partition.
- Enter 100 MB for its size.
- Choose Primary.
- Choose Beginning.
- Now select the Use as: option and change it to "physical volume for RAID." Also turn the bootable flag on. (This is going to be the /boot partition remember).

- Then choose "Done setting up the partition."
- Repeat 8 through 13 for the other drive as well.


- Now we need to set up the swap partition. Select the "FREE SPACE" on the first drive.

- Choose Create a new Partition.
- Enter 256 MB for the size.
- Choose Primary.
- Choose Beginning.
- Select the Use as: option but this time choose "swap area."
- Select "Done setting up the partition"
- Repeat steps 2 through 7 for the other drive.

- You should have a similiar set-up as the screenshot below. We could break our root partition down into /home, /usr, /var, etc. I want this to be simple and easy to do. Once you can do this basic set-up you will know how to do the more elaborate.

- Choose the "FREE SPACE" on the first hard disk.
- Choose Create a new partition.
- Use the default value that is already supplied. In my case it is 8.2 GB. This will use the rest of the disk for the root partition.
- Choose primary.
- Now select the Use as: option and change it to "physical volume for RAID."
- Select "Done setting up the partition."
- Repeat steps 2 through 7 for other drive.
- You should have a similar screen as below. Go ahead and choose "Configure software RAID." (It's at the top)


- Your next screen will ask you if you are really sure about your partitioning. Choose "Yes."

- Now select "Create MD device."

- Choose "RAID1"

- Now it will ask you how many active devices for the RAID1 array. Since we only have two drives we will leave it at 2 and continue.

- Now it asks about spares. We don't have any so we will leave it at 0 and continue.

- Now we need to choose the two partitions that are going to mirror each other. In my example it will be /dev/sda1 and /dev/sdb1. Choose both using the space bar to select/deselect and then continue.

- That's it. You've created the MD device for the /boot partition. Repeat steps 2 through 6 but choose /dev/sda3 and /dev/sdb3 in the last step.
- Once you have created both MD devices you can select "Finish."


- We still have to give those RAID1 devices a mount point and filesystem. Follow the steps below to do it.

- Select the partition under RAID1 device #0. Mine says "#1 98.6 MB"
- Select the Use as: option and choose Ext3 (or whichever one you want).
- Change the Mount point: to /boot

- Then you can select "Done setting up the partition."
- Now repeat steps 3 through 5 for RAID1 device #1, the 8.2 GB partition. This partition will be mounted to /, which is root.
- Once you have these partitions made you can select "Finish partitioning and write changes to disk"

- Before it makes the changes it gives a nice warning about destroying data. Choose "Yes" to write the changes to disk.
- You may get another screen warning about the kernel not being able to access the RAID devices. Just continue and the base system will install as normal.


That's really all it takes to set up a RAID1 array with two hard disks of the same size. Now you can know that if one of your drives were to fail you would still have all of the data because of the RAID1 array. Back-ups must still be made in the case of the failure of both of the drives. That's why I will use rsync and an external drive. Hope this is useful for everyone!
6 comments:
Awesome howto
Super Duber Osome!!!! Thank you very much!!!!
I've been struggling with this and an onboard FakeRaid, this software only solutions looks like the best one I've seen! Thanks.
This is awesome - I have one question though. I am using an older computer that uses IDE. Do I put HD1 as primary and HD2 as secondary before I go through the partitioning?
Thank you!
This instructions are great, just what I needed.
I think there's one small mistake though. Step 6 in the last section says "repeat steps 3 through 5", but I don't think you want to repeat step 4. You don't want to set this partition to '/boot', you want to set it to '/'. I hope I'm right, because that's what I've done (as that's what it looks like you did from the screenshot).
Thanks again.
Asher
Are you putting the swap file on the RAID? I think it should be there if you want the system to stay up and running in case of a single drive failure.
If the swap is not on the RAID, any memory pages on the failed drive will be lost, and those lost memory pages will likely crash the system. (Rebooting the crashed system should still work, though, because the failed drive won't be used on the next boot.)
Post a Comment