Showing posts with label programming. Show all posts

Friday, March 11, 2011

Install Komodo Edit 6 on Natty

Just wanted to give a quick update on how to install the latest Komodo Edit on the latest Ubuntu. Its been a while since I posted the last article about Komodo Edit and it needed a quick refresh.

  • The packages for Linux can be found here. Download the appropriate package for whether you have 32-bit or 64-bit.
  • Use either the GUI to extract the contents or
tar -xvzf Komodo-version-platform.tar.gz
  • In your terminal, or open a terminal if you haven't already, change to the new directory
cd Komodo-version-platform
  • Run the install script. I had to use sudo before the script to get it to install.
sudo ./install.sh
  • Go through and answer all of the installer prompts
  • Once the installer finishes you will need to add Komodo Edit to your PATH. Personally I like the symlink method, but it does require root/sudo access.
ln -s /bin/komodo /usr/bin/komodo
Two caveats that I have found is that you probably should not install to the default because it will only work for root or if you sudo. I went ahead and installed to /opt/komodo, but you could install wherever you like to install your non-package maintained software. Second, the installer actually tells you to make the symbolic link in /usr/local/bin but I have found that is not in the default PATH of the users (though it could be added). Other than that it is pretty straight forward. Let me know if you all find any other pain points.

Monday, June 14, 2010

Eclipse Install with Lucid

I am merely posting this to give a quick update to the process for installing Eclipse with Lucid. It seems that the Ubuntu repositories have finally caught up with the latest release of Eclipse so there is no need to download the package off of the Eclipse website. Just a few terminal commands will do it:

sudo apt-get update
sudo apt-get install eclipse
This should work quite well and it will install Eclipse SDK 3.5.2. You can then proceed as usual with your normal set-up and install of plugins with Eclipse. Enjoy!

Tuesday, April 13, 2010

Using Appcelerator Titanium with Ubuntu

As anyone can tell by reading other posts in this blog, I am a programmer and I try and use various programming languages and methods all the time. I found Titanium a few months ago and started using it when it was only version 0.7. It has matured very quickly since then and it makes for an interesting platform to develop on. To describe it in a just a sentence it allows for crossplatform desktop application development using only HTML and Javascript. You can also use PHP, Python, and Ruby, but you don't have to. There is also a mobile development side that works quite well also. For a full desciption of what it can do head over to Appcelerator.com.

Follow these steps to install for Ubuntu 9.10:

  1. Navigate to Appcelerator.com and click download Titanium.
  2. Click on the link to download either 32-bit or 64-bit Linux. If you are unsure just use the 32-bit.
  3. Extract the archive and put the extracted folder anywhere you want. Personally I have a folder where I keep any downloaded programs in my home folder.
  4. There is an executable file called "Titanium Developer" inside of the extracted that you can then run and follow the directions to install it. I usually choose to install it into my home folder because I had problem with installing it anywhere else.
  5. The last thing you may want to do is create a shortcut either on the desktop or in the menu so you can easily start Titanium Developer. This can be done with the alacarte program.
Go ahead and start creating your desktop programs, and relish in the fact that you did not have to use any other language besides the ones you already use for web development.

Monday, August 24, 2009

Ubuntu Google Web Toolkit Setup


It's easy to get started with the Google Web Toolkit and Ubuntu 9.04. There are a couple of steps you will want to take to ensure a proper setup.
First let me start by mentioning that the easiest way to do this is to use Eclipse. Eclipse is a full-featured Java IDE. Many complain that it is too slow, crashes, etc. Since Google developed a plugin for Eclipse and most likely their software engineers are using it, I think it would be best to use it as well. Now on to the actual steps.
Get Eclipse Installed and Working
  1. Don't use synaptic to install Eclipse. If you already have it installed through synaptic that's okay, but you will have two versions of Eclipse on your computer.
  2. Download the latest copy of Eclipse at http://www.eclipse.org/downloads. Don't worry about all the different versions. Just download the Eclipse Classic at the bottom of the list.
  3. Extract to a directory on your hard drive. I happen to put all of my programs that I install manually in a folder, /home/username/Software. This helps me keep track of all my programs I've installed manually.
  4. You should be able to start Eclipse either through the command line (after you change to the directory) or by double-clicking eclipse inside of the folder.
Install Google Web Toolkit Plugin
  1. Start Eclipse if you haven't already.
  2. Help > Install new software...
  3. Click the add button. Put GWT Plugin for name and paste in for the url:

    http://dl.google.com/eclipse/plugin/3.5
  4. Check the boxes labeled Plugin and SDKs. 
  5. Follow through the wizard. You will have to agree to the license.
  6. Once you finish with that window you will want to restart Eclipse. After that you can begin working with GWT in Ubuntu.
This worked for me on 32bit and 64bit Ubuntu. Hopefully you will be able to start building your Google Web Toolkit applications in Ubuntu.

Sunday, March 15, 2009

Installing Komodo Edit 5

Here is another useful tip for having a good development environment. Since there are many Integrated Development Environments on the market I have been going through each one to see what I like and don't like. I have tested many different IDEs available for PHP programming and I have come to like Komodo-Edit. This is the light (free) version of the Komodo IDE 5 program. Since this is not available via a repository let me show you how to install this into your Ubuntu system.
  1. Download the latest release for Linux by visiting this link (click the link that says download now).
  2. If you are using the gnome desktop you can right-click and select extract here or you can extract using the tar command.
    tar zxvf Komodo-Edit-5.0.3-2767-linux-libcpp6-x86.tar.gz
  3. Open up a terminal and move to that directory using cd. Mine is on my desktop so the command looks like this:
    cd Desktop/Komodo-Edit-5.0.3-2767-linux-libcpp6-x86/
  4. Now run:
    sh install.sh
  5. When you are asked where you would like to install it go ahead and type the directory to where it should be installed. Personally I put all custom installs into a folder called Software in my home directory:
    /home/myuser/Software/Komodo-Edit-5
  6. Once it finishes you still have one more step, inserting the executable into your PATH variable. This can be done with a simple command:
    sudo ln -s "/home/myuser/Software/Komodo-Edit-5/bin/komodo" /usr/local/bin/komodo
I have tested Komodo Edit on both x86 and x86_64 and it works fine even on the 64 bit system. If you get frustrated with other IDE setups go ahead and check out Komodo Edit, it may be your next best editor. By the way you can also edit Perl, Python, Ruby, Tcl, Javascript, CSS, XHTML, and some template languages besides PHP.

Thursday, January 15, 2009

Developing with NetBeans IDE

Programming is a hobby of mine and in recent days I have been testing out various IDEs (Integrated Development Environments). One such that I have really enjoyed using is the NetBeans IDE. One of the greatest features (at least in my opinion) is that no matter what OS I am using I can still be editing my programs with Netbeans. In my daily routines I will end up using Windows, Mac, and Linux so cross platform applications will always get a plus in my book. I also find that one of my greatest frustrations about programming is that most developers only create programs for a specific OS. Now, I understand why they do this (majority), but for people like me (minority) it is always a drawback to an application that only works in one OS. Enough ranting though lets get the latest NetBeans installed in your Ubuntu computer.
  1. Go to http://www.netbeans.org/downloads/index.html to download the version you want. Personally I chose the Java version but if you want Ruby, C++, or PHP you will want the All version. At the time of this writing the current version is 6.5 and my download was 208 MB.
  2. Wait for download to complete...
  3. Open a terminal and cd to the directory you saved it in. For me I saved it to my desktop so I typed in: cd Desktop/
  4. Now type: ./netbeans-6.5-ml-java-linux.sh (or whatever your version happens to be, use tab to autocomplete).
  5. If that doesn't work then it is possible that it needs the permission to execute. You could right-click>properties. Then under permissions check the box that says "Allow executing file as program" or you could type into command line: chmod +x ./
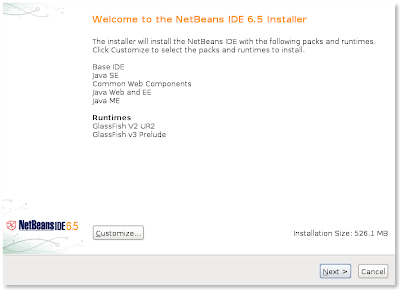
  6. You should see a screen much like the one above. Just follow the prompts and you will have NetBeans installed in no time.
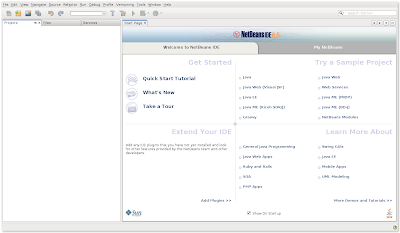
Below is a screenshot of NetBeans right after opening it for the first time. Now all that needs to be done is some programming projects. Hope this is useful!